Table of Contents
ToggleBear Paw Battlefield has become one of the most challenging endgame dungeons in modern gaming, and if you’re here, you’re probably looking to conquer it efficiently. Whether you’re farming for rare artifacts, hunting specific crafting materials, or just trying to clear it without wiping your entire team, this guide breaks down everything you need to know. We’ll cover the exact mechanics, optimal team compositions, loot tables, and the tactics that separate quick runs from frustrating failures. By the end, you’ll have a blueprint for consistent, profitable clears.
Key Takeaways
- Bear Paw Battlefield is an endgame domain requiring Adventure Rank 40+ and well-invested level 80+ characters with 4-piece artifact sets for consistent 2–4 minute clears.
- Success in Bear Paw Battlefield depends on mastering three-phase boss mechanics: dodging area attacks in phases one and two, and managing aggressive enraged attacks and projectile clusters in phase three.
- Building a cohesive team around specific elemental reactions (freeze, vaporize, overload) and ensuring Energy Recharge of 120–140% on supports is essential for DPS uptime and survival.
- Every clear guarantees a 5-star artifact from sets like Emblem of Severed Fate or Shimenawa’s Reminiscence, plus crafting materials—plan farming to prioritize sands and goblets for optimal main-stat rolls.
- Common mistakes like underleveled supports, ignoring artifact substats, and poor team synergy can be avoided through proper character investment and learning attack patterns via 10+ practice runs.
- Advanced techniques such as animation canceling, burst cycling, and pre-buff timing can reduce clear times to sub-2-minute speedruns, though solid fundamentals matter more for casual farming success.
What Is Bear Paw Battlefield?
Bear Paw Battlefield is a high-difficulty domain that demands precise execution and well-invested characters. It’s not a casual side quest, it’s the endgame grind where players farm for powerful artifacts and rare materials needed to strengthen their rosters.
The domain features a mix of elemental enemies and a challenging boss encounter that punishes mistakes. Clear times typically range from 2 to 4 minutes depending on team composition and investment level. The rewards justify the effort: guaranteed 5-star artifact drops, high-rarity crafting components, and occasional bonus loot for fast clears.
Unlike open-world content, Bear Paw Battlefield requires specific preparation. You can’t stumble through with underleveled characters. Every slot in your team matters, and element matchups aren’t optional, they’re fundamental to survival and DPS.
How to Unlock and Access Bear Paw Battlefield
Requirements and Prerequisites
Before you can even attempt Bear Paw Battlefield, you’ll need to meet certain thresholds. Adventure Rank 40 is the absolute minimum, though AR 50+ is strongly recommended for survivability. Your main DPS should be level 80 or higher, and supports at level 70 minimum.
You’ll also need:
- At least one fully built 5-star character (level 80, talents 6/6/6 or higher)
- Two dedicated support characters with appropriate roles (healer, buffer, or shielder)
- A secondary DPS for element coverage
- Adequate artifacts on all team members (4-piece sets with appropriate main and sub-stats)
The entry requirement is 40 Original Resin per attempt. If you’re serious about farming, you’ll want to bank your Resin or use Condensed Resin to stack multiple runs.
Step-by-Step Unlock Process
You’ll unlock Bear Paw Battlefield through story progression. Complete the main storyline questline up to Chapter 3, Act 1. Once you finish that sequence, the domain becomes available from the domain menu.
Here’s the exact path:
- Progress main story until you reach the Bear Paw region
- Complete all world quests in that area (they’re mandatory for proper progression)
- Interact with the domain entrance marker on your map
- Confirm you meet the recommended Adventure Rank
- Click “Enter Domain” and select your team
If you don’t see the unlock prompt, double-check that you’ve completed all prerequisite quests. Some players miss optional story content that gates domain access. Once unlocked, the domain stays available indefinitely, you can revisit it unlimited times as long as you have Resin.
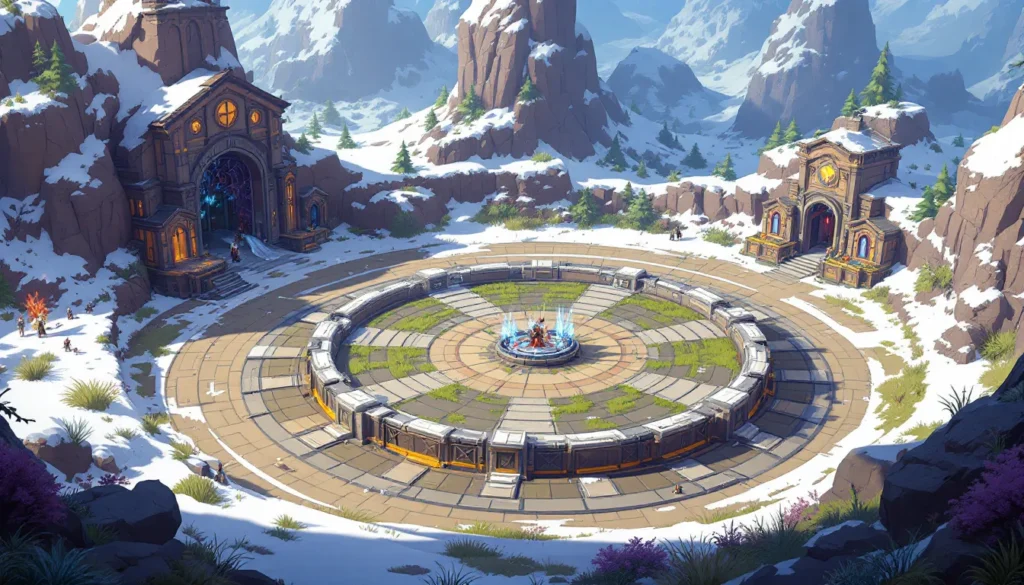
Map Layout and Key Locations
Critical Hotspots for Combat and Loot
Bear Paw Battlefield consists of three connected arenas. The first chamber is relatively straightforward, it’s a warm-up with standard mobs and no major mechanics. Your real challenge starts in chamber two, where the difficulty spikes significantly.
The boss arena is where the fight matters. It’s a large, open circular chamber with minimal environmental cover. That means you can’t hide behind pillars or exploit terrain, pure positioning and character mechanics carry the fight. The boss spawns in the center, and the arena has no safe zones. You need to manage damage through active defense: shields, heals, or invulnerability frames.
Critical positioning notes:
- Stay mobile. Stationary DPS gets punished by area attacks
- Use the space to create separation between your active character and the boss
- Know your character’s dodge patterns, some have generous i-frames, others are punishing
Safe Farming Routes and Hidden Chests
While Bear Paw Battlefield is a closed domain with no hidden side content, there are minor optimizations for faster clears. The fastest route skips unnecessary mob interaction in early chambers, use ranged damage to cleave groups quickly rather than engaging individually.
For chamber one, position your team at the entrance and use AoE abilities to soften the first pack. This lets you burst them down before they close distance. Same strategy applies to chamber two: crowd control and AoE damage reduce time spent in combat.
There are no secret chests in this domain. All rewards come from completing chambers and defeating the final boss. Your loot is guaranteed at the end screen, there’s no randomness in whether you receive drops, only in the specific rarity and substats of artifact rolls.
Enemy Types and Combat Mechanics
Boss Encounters and Strategies
The Bear Paw Battlefield boss is a multi-phase encounter. Phase one lasts until the boss reaches 66% health. Phase two runs from 66% to 33%, and phase three is the final stretch. Each phase introduces new mechanics you need to manage.
Phase One Mechanics:
- The boss performs a basic attack chain followed by a ground slam that deals AoE damage
- After 15 seconds of combat, it charges an area attack that covers roughly 40% of the arena
- Dodge this by moving to the opposite side or using an invulnerability frame ability
- Element doesn’t matter much here, focus on consistent damage output
Phase Two Changes:
- The boss gains a new move: a homing projectile attack that targets the active character
- These projectiles track you but move slowly, simply sidestep or use shields to block
- It also spawns two small adds that need to be cleared quickly
- Clear the adds before resuming boss damage, or you’ll get overwhelmed by split attention
Phase Three (Final 33%):
- The boss becomes enraged and attacks more frequently
- The area slam now appears twice instead of once
- The homing projectiles come in clusters of three
- Your shield or healer needs to be reliable here, this phase tests survivability
Best strategy: Use your primary DPS to build burst damage in phases one and two. Save your ultimate abilities for phase three when the damage window matters most. Healer placement is critical, don’t let them get caught in the boss’s attacks. A shielder can be more valuable than raw healing if your DPS characters have low defense stats.
Regular Mobs and Their Weaknesses
Mobs in chambers one and two are largely filler. They’re designed to burn through your Resin and create a timer pressure, not to be a real threat. Most are standard slimes, hilichurls, and basic humanoid enemies.
Element matchups do matter:
- Pyro enemies (fire slimes, pyro hilichurls): Use hydro or cryo damage to break their resistance. Electro also works but less efficiently
- Hydro enemies (water slimes): Electro deals double damage and causes paralysis
- Cryo enemies (ice shards, frost enemies): Use pyro for reliable breaks
- Electro enemies (lightning slimes): Grounded characters are weak to these: use cryo or hydro
Don’t overthink mob encounters. Use your AoE abilities and move forward. The boss is where preparation pays off.
Loot Tables and Rewards
Rare Drops and Best Farming Methods
Bear Paw Battlefield guarantees a 5-star artifact drop every clear. This is guaranteed, you will always receive a domain-exclusive artifact. The specific piece (flower, plume, sands, goblet, circlet) is determined by RNG, so patience and volume farming are your friends.
The domain drops artifacts from these sets:
- Emblem of Severed Fate: Crit-focused set with Energy Recharge bonuses. Excellent for ability-spam characters
- Shimenawa’s Reminiscence: Attack-heavy set that trades Energy Recharge for raw damage
- Pale Flame: Physical damage set. Situational but powerful on characters designed for basic attacks
Rare drops occur roughly every 15–20 clears: special curio items that upgrade your characters’ talents or provide exclusive consumables. These aren’t guaranteed, so plan your farming around the artifact pieces you need first.
Best farming method: Run Bear Paw Battlefield on repeat during daily Resin refresh periods. Use Fragile Resin if you’re trying to complete a set quickly. Focus on farming one artifact piece at a time. Target sands and goblets first since they have the most valuable main-stat rolls. Circlets come later unless you desperately need crit rate or crit damage.
Materials and Crafting Components
Secondary rewards include crafting materials used to upgrade talents and weapons:
- Meteorite Shards (100% drop rate): Used for weapon enhancement across the full roster
- Forgotten Fruits (high drop rate): Talent material needed to level character abilities past level 6
- Resonance Stones (medium drop rate): Premium crafting material that speeds up artifact enhancement
These aren’t optional, you need them for character progression. Plan your farming schedule to stock up on materials while hunting for specific artifacts. Most active players run this domain 10–15 times per week, which supplies enough materials for steady character growth.
Recommended Team Compositions and Characters
Best DPS and Support Setups
The meta for Bear Paw Battlefield shifts slightly with patch updates, but certain character archetypes consistently perform well. Your primary DPS should be capable of dealing sustained damage over 3+ minutes without relying on burst windows.
Top-Tier DPS Characters:
- Hu Tao: Raw damage output is unmatched if you have her signature weapon. Requires precise animation canceling for peak performance
- Ayaka: Fast attack speed and consistent freeze damage. Excellent for players who struggle with positioning
- Nahida: Dendro applicator that enables reaction chains with nearly every sub-DPS. Highest ceiling for damage potential
- Fischl (with C6): Electro off-field damage that scales indefinitely with your team’s attack speed
These characters clear the domain in 2–3 minutes with proper investment. Anything slower indicates either underleveled artifacts or suboptimal team synergy.
Support Roles:
- Healer: Kokomi provides both healing and hydro application. Bennett offers attack buff plus healing but has element conflicts in some teams
- Shielder: Zhongli gives universal resistance shred plus a shield that trivializes the boss’s damage. Nearly mandatory for endgame content
- Buffer: Kazuha or Nahida increase elemental damage and provide off-field application. Either works depending on your main DPS’s element
Artifacts and Weapon Recommendations
Artifact selection depends on your DPS character, but here are universal guidelines:
Primary DPS Artifacts:
- Flower & Plume: Prioritize Attack% main stat and Crit Rate/Crit Damage substats
- Sands: Element damage% if available, otherwise Attack%. Crit Rate/Damage substats
- Goblet: Match to your character’s damage type (Hydro%, Pyro%, Physical%, etc.)
- Circlet: Crit Rate or Crit Damage based on your current ratio. Target 1:2 ratio (33% crit rate = 66% crit damage)
Support Artifacts:
- Healers: HP% main and sub-stats. Healing Bonus if available
- Shielders: HP% or Defense% depending on character kit
- Buffers: Attack% or Elemental Damage% depending on their scaling
Weapon Recommendations:
- 5-Star Options: Signature weapons for your DPS always outperform alternatives. If unavailable, use a 4-star with appropriate stats
- F2P Weapons: Amenoma Kageuchi (Ayaka), Widsith (catalyst users), Favonius Warbow (supports)
- Avoid: Weapons that don’t match your character’s scaling stat or require stats they don’t build (e.g., Defense scaling weapons on attack-scaling characters)
Weapon leveling is less critical than artifact quality. A fully leveled 4-star weapon and mediocre artifacts will lose to a broken-down 5-star with optimized substats every time.
Common Mistakes and How to Avoid Them
Mistake 1: Bringing Underleveled Support Characters
Newbie players often slot level 40 supports into endgame teams assuming “they don’t need investment.” This is backwards. Your healer or shielder needs high HP or Defense scaling to be effective. A level 40 Kokomi dies to the boss’s second attack and can’t heal enough to keep your DPS alive. Level all team members to at least 70, ideally 80+.
Mistake 2: Neglecting Artifact Substats
Many players farm 5-star artifacts and immediately equip anything with the right main stat. Substats matter enormously. A flower with +20% Crit Rate in substats is infinitely better than one with flat HP and defense rolls. Spend time rolling artifacts and farming for optimal combinations. Yes, it’s tedious, that’s endgame.
Mistake 3: Not Managing Energy Recharge
Characters with powerful ultimates need enough Energy Recharge to use them on cooldown. This is especially true for supports and sub-DPS characters. Check your team’s combined energy generation. If your main DPS never has their ultimate available for critical moments, you’re losing significant damage. Aim for 120–140% Energy Recharge minimum on support characters.
Mistake 4: Poor Team Element Synergy
Building a team with four random good characters doesn’t work. Reaction-based teams (freeze, vaporize, overload) benefit from specific element combinations. A cryo DPS with two hydro applicators and a buffer is cohesive. A pyro DPS, electro sub-DPS, and two random healers is chaos. Plan your team around an intended reaction or strategy.
Mistake 5: Ignoring the Boss’s Attack Patterns
Players who panic-dodge everything take unnecessary damage and waste time repositioning. Learn the boss’s attack tells. Know which moves have long telegraphs (safe to ignore) and which ones need immediate reaction. Once you’ve run the domain 10+ times, the patterns become automatic, and you’ll clear faster and take less damage.
Mistake 6: Using Damage-Over-Time (DoT) Abilities in Phase Three
Burnout-based strategies (applying lingering debuffs) backfire in the final phase when the boss becomes mobile and erratic. Stick to burst damage and consistent on-field damage. Your two-minute clear strategy breaks down if you’re relying on effects that take time to resolve.
Advanced Tactics and Speedrun Tips
Optimization 1: Elemental Burst Cycling
To minimize downtime between damage windows, synchronize your team’s ultimate abilities. Your main DPS should have their burst ready exactly when your support’s buff expires. This requires understanding your team’s energy economy. Practice your rotation in open world first, don’t test it for the first time in a domain run.
Optimization 2: Animation Canceling
Some characters (Hu Tao, Ayaka) have animations that can be interrupted or sped up through movement commands or ability inputs. Learning these techniques saves 10–15 seconds per clear. YouTube guides for your specific character will show exact inputs. It’s not required for casual play, but it’s essential if you’re pushing sub-2-minute times.
Optimization 3: Grouping Mobs for AoE Efficiency
In chambers one and two, use crowd control abilities to bunch enemies together. This lets your AoE damage hit maximum targets simultaneously, clearing waves in one cycle rather than two. A single well-placed Kazuha ultimate can finish an entire mob pack.
Optimization 4: Weapon Switching During Gameplay
Some advanced players swap weapons mid-combat if they’re carrying multiple built sets. This is niche but powerful for setups like Fischl (fast attack speed) switching to a heavy damage dealer (Hu Tao) after off-field setup. It’s overkill for most players but viable for competition or self-imposed speedrun challenges.
Optimization 5: Pre-Buff Before Boss Phase
Time your support’s buff abilities to expire right as the boss enters the arena. Your DPS then applies a new buff while entering the boss fight, stacking benefits. This sounds minor but creates a 20–30% damage spike at the fight’s start, letting you burst the boss faster.
Community Speedrun Records
Top players consistently clear Bear Paw Battlefield in 90–120 seconds with max-investment teams. These runs showcase perfect rotations, zero wasted movements, and ideal RNG for artifact drops. Your personal best will be slower, and that’s fine, most casual players finish in 2–3 minutes with solid teams. Check Metacritic and similar sites for leaderboard discussions if you’re interested in competitive timeframes.
Conclusion
Bear Paw Battlefield rewards preparation and execution. Success isn’t luck, it’s investing in your characters, understanding the boss’s mechanics, and optimizing your team composition. Start with the fundamentals: level your team, farm decent artifacts, and learn the boss’s attack patterns. Once those are solid, layer in advanced tactics like animation canceling and burst cycling.
The domain’s difficulty is a feature, not a bug. It’s designed to give endgame players something that demands respect. Your first clear will feel overwhelming. Your tenth will feel routine. Keep farming, keep optimizing, and eventually you’ll hit your personal best time.
Resources like Twinfinite’s guides and Game Rant coverage offer character-specific optimization tips if you’re stuck on a particular setup. The gaming community is genuinely helpful when you have specific questions about team building or mechanic details. Don’t hesitate to ask in forums or Discord servers dedicated to your favorite game, experienced players love sharing knowledge with people genuinely trying to improve.


